Working from home has become the norm since the start of the COVID-19 pandemic for me, and it doesn’t look like this
will change in the near future. As working from home goes hand in hand with online meetings it can come in handy to
be able to notify members of your household that you are busy and prefer not to be interrupted. While there are low-tech
solutions available (e.g. putting a rubber band on the door knob …) I decided to make a web app to do this.
During tech job interviews it seems to be common practise to ask applicants to develop a small piece of software during
a rather limited amount of time. Only having worked in academia this concept is foreign to me! To check how I would hold
up during such an interview, I decided to set a time limit for myself of four hours (half a working day) and see how far
I would get.
Picking the right tools
To do this efficiently it is imperative to pick the right tools for the job. As this is a webapp, using Flask is for
me a given as this is the framework I’m most comfortable with. We’ll need a database and a way to add/change/remove data
so Flask-SQLAlchemy and Flask-Admin are pretty solid options. Furthermore, I’ll need a CSS library to make the
front-end look acceptable with little effort. Typically Bootstrap is my goto library for larger projects, though here
it would be a little overkill for the intended purpose. Milligram on the other hand is great for small projects.
Unfortunately, Milligram doesn’t support panels/cards out of the box, which I really needed to get the layout I had in
mind. Given it would be a fair amount of work to implement these from scratch, ultimately I landed on Bulma.
Finally, having some pre-established code skeleton to get started with can come in handy. You could use a cookiecutter
for Flask to create a basic app with just a few commands. Though as I never used these, I grabbed some code from a
previous project MemoBoard which uses a lot of the same components.
The first hour: Getting a basic app running
You can find the code I whipped up in a little under an hour here.
It leverages the boilerplate code from MemoBoard and Flask-Admin to get data in the database and comes with a very basic
template (text only) to show who is and isn’t busy. It worked, but it was ugly.
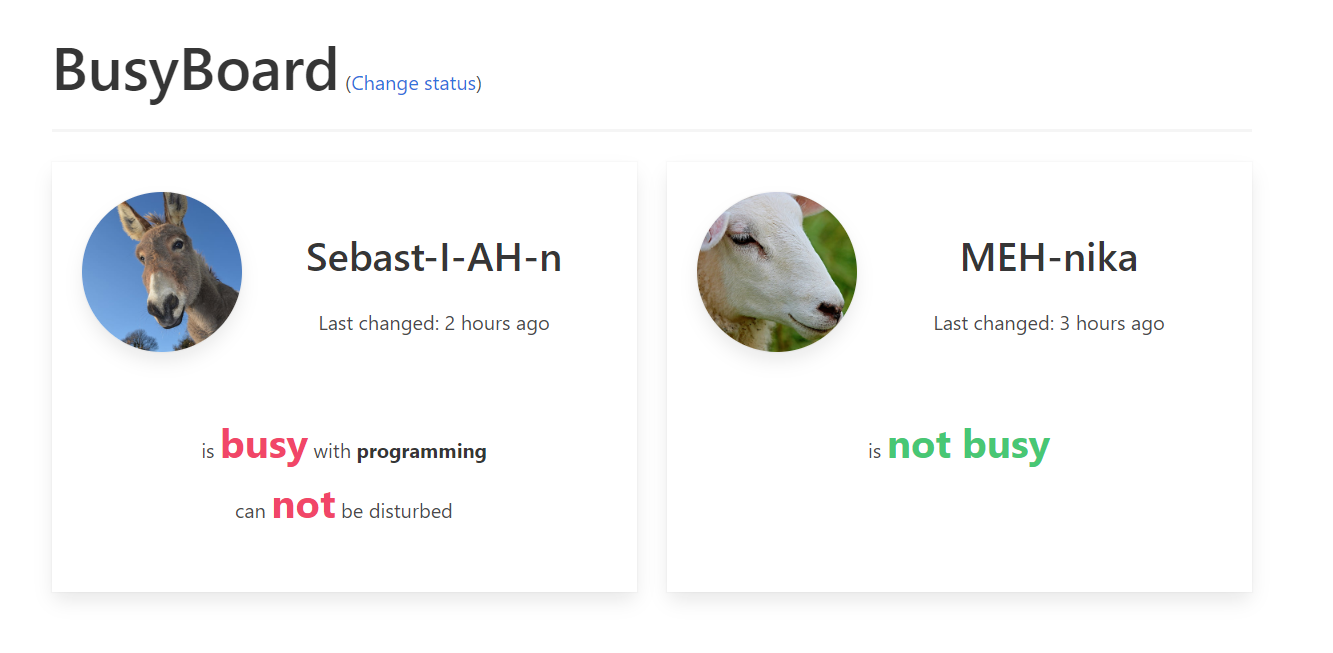
The next two hours: Making it look nice
The layout left much to be desired, so this was improved by adding some CSS to the template. The Bulma CSS framework
was great to quickly make some cards for each user, and after some tweaking it looked great. Using some of the more
advanced options from Flask-Admin it was also made easy to change the status of users from the admin panel. Though, at this stage I also decided to make it
possible for users to add their picture. Flask-Uploads can be used to handle the uploads and there are some options to
integrate this with Flask-Admin, which are documented on here. This took a few attempts and
a fair amount of time was lost figuring out that Flask-Uploads wasn’t compatible with the most recent version of
Werkzeug.
So about three hours into the project ended up with this version.
Interesting bits of the code are highlighted here.
The last hour: The final touches
One last feature I really wanted, was to show when someone’s status was updated. An elegant solution here is to hook into an
SQLAlchemy event that triggers before an entity is updated. This allows you to change the field last change right before
the data is changed into the database. This can also be accomplished in just a few lines of code and will guarantee that
any change made through SQLAlchemy to a user, will update the field. To get the timedelta between the current time and
the last change in a human readable format the Arrow library is awesome and easy to use.
Finally, I spend a few minutes writing some documentation. As this is about as traditional a Flask app can be I was
able to defer a lot to the official documentation.
The Code
If you want to see how this project evolved you can see the commit history in the GitHub repository.
models.py
The database model, only one table is present for users, there are a couple properties to play along with Flask-Upoads
and Arrow. Though the cool part is the function on_change and the last line which hooks this on the
before_update event of SQLAlchemy. With this small bit of code, each time an entry is changed, the field last_update
is automatically updated as well.
from busyboard import db, images
from datetime import datetime
import arrow


class User(db.Model):
    __tablename__ = 'users'
    id = db.Column(db.Integer, primary_key=True)
    name = db.Column(db.Text)
    busy = db.Column(db.Boolean)
    busy_with = db.Column(db.Text)
    can_be_disturbed = db.Column(db.Boolean)
    notes = db.Column(db.Text)
    path = db.Column(db.Unicode(128))
    last_change = db.Column(db.DateTime, default=datetime.utcnow)

    @property
    def url(self):
        if self.path is None:
            return
        return images.url(self.path)

    @property
    def filepath(self):
        if self.path is None:
            return
        return images.path(self.path)

    @property
    def last_changed(self):
        age_arrow = arrow.get(self.last_change)
        return age_arrow.humanize()

    @staticmethod
    def on_change(mapper, connection, target):
        target.last_change = datetime.utcnow()


db.event.listen(User, 'before_update', User.on_change)
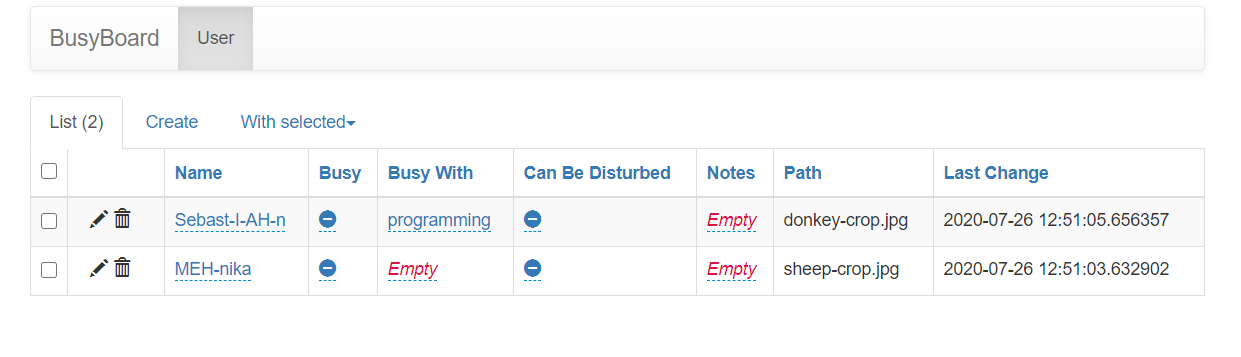
admin.py
The very first release just used the default ModelView from Flask-Admin. This is great to get started and requires
virtually no code at all to get a CRUD interface for a table, for more fine grained control a little extra work is
required.
column_editable_list for instance is nice to set, as this allows records to be edited directly from the overview
page. CustomIndexView is defined here to hide the Home button in the admin panel (which serves no purpose) and
replace the link behind the name with a link to the main app (so you can easily return to the app after making a change)
.
The function _list_thumbnail adds a thumbnail preview once an image is uploaded and there is some additional code in the
class to link this to the model. The ImageUploadField is added here to allow users to upload an image and write the
path to the model in one sweep while preventing users to meddle with the path themselves.
from flask import redirect, url_for
from flask_admin.contrib.sqla import ModelView
from busyboard import form
from jinja2 import Markup
import os
import uuid
from werkzeug import secure_filename
from flask_admin import expose, AdminIndexView
def _list_thumbnail(view, context, model, name):
if not model.filename:
return ''
return Markup(
' '.format(model=model)
)
class UserAdminView(ModelView):
form_columns = ('name', 'busy', 'busy_with', 'can_be_disturbed', 'notes', 'path')
form_excluded_columns = ('last_updated')
column_editable_list = ('name', 'busy', 'busy_with', 'can_be_disturbed', 'notes')
form_create_rules = ('name', 'busy', 'busy_with', 'can_be_disturbed', 'notes', 'path')
form_edit_rules = ('name', 'busy', 'busy_with', 'can_be_disturbed', 'notes', 'path')
can_create = True
column_formatters = {
'image': _list_thumbnail
}
form_extra_fields = {
'path': form.ImageUploadField(
'Image',
base_path='busyboard/static/images',
url_relative_path='images/',
)
}
class CustomIndexView(AdminIndexView):
def is_visible(self):
# This view won't appear in the menu structure
return False
@expose('/')
def index(self):
return redirect(url_for('main_route'))
'.format(model=model)
)
class UserAdminView(ModelView):
form_columns = ('name', 'busy', 'busy_with', 'can_be_disturbed', 'notes', 'path')
form_excluded_columns = ('last_updated')
column_editable_list = ('name', 'busy', 'busy_with', 'can_be_disturbed', 'notes')
form_create_rules = ('name', 'busy', 'busy_with', 'can_be_disturbed', 'notes', 'path')
form_edit_rules = ('name', 'busy', 'busy_with', 'can_be_disturbed', 'notes', 'path')
can_create = True
column_formatters = {
'image': _list_thumbnail
}
form_extra_fields = {
'path': form.ImageUploadField(
'Image',
base_path='busyboard/static/images',
url_relative_path='images/',
)
}
class CustomIndexView(AdminIndexView):
def is_visible(self):
# This view won't appear in the menu structure
return False
@expose('/')
def index(self):
return redirect(url_for('main_route'))
init.py
Here is all the code to set up the busyboard app, nothing really surprising here apart maybe the createdb section.
This adds an command line interface option to create the database using flask createdb
import os

from flask import Flask, render_template
from flask_sqlalchemy import SQLAlchemy
from flask_admin import Admin, form
from busyboard.admin import UserAdminView, CustomIndexView
from flask_uploads import UploadSet, IMAGES, configure_uploads, patch_request_class

db = SQLAlchemy()

images = UploadSet('images', IMAGES)


def create_app(config):
    # Set up app, database and login manager before importing models and controllers
    # Important for db_create script

    app = Flask(__name__)
    app.config.from_object(config)

    db.app = app
    db.init_app(app)

    configure_uploads(app, (images))
    patch_request_class(app, 16 * 1024 * 1024)

    from busyboard.models import User

    admin = Admin(app, name='BusyBoard', template_mode='bootstrap3', index_view=CustomIndexView())
    admin.add_view(UserAdminView(User, db.session, endpoint='users'))

    @app.route('/')
    def main_route():
        users = User.query.all()
        return render_template('index.html', users=users)

    @app.cli.command()
    def createdb():
        """
        function to create the initial database and migration information
        """
        SQLALCHEMY_DATABASE_URI = app.config['SQLALCHEMY_DATABASE_URI']

        if SQLALCHEMY_DATABASE_URI.startswith('sqlite:///'):
            path = os.path.dirname(os.path.realpath(SQLALCHEMY_DATABASE_URI.replace('sqlite:///', '')))
            if not os.path.exists(path):
                os.makedirs(path)

        db.create_all(app=app)

    return app
Conclusion
In about four hours I was able to create a rather funny little app that met all my requirements. This really is a
testament to how much you can do with very little time and coding using Python and its ecosystem. It was also interesting
to simulate how such a job interview would go, though in case this was serious I would have spend more time
on adding tests rather than having users’ images.
0 Comments